Landscaping for Wildlife – Part 4
December 9, 2013
Room to Grow
With this article we’ve reached Part 4 of our series on Landscaping for Wildlife. Our final topic is on providing the necessary habitat for wildlife to bear and raise their offspring. This involves strategies so that both adults and young can be safe from predators, weather and human curiosity (or vandalism). Your wildlife habitat needs to be a sanctuary where the entire life-cycle of the animal can take place. This may not be feasible with all wildlife that visits your garden or property, but it shouldn’t be an issue with birds, butterflies and moths, other insects, reptiles and amphibians. 
 In the American River canyon near where I live we have quite a number of California Pipevine (Aristolochia californica) plants growing into the live oak and Douglas-fir that cover the north-facing slopes. These vines are the host plant for the Pipevine Swallowtail (Battus philenor). To provide a food source for the larvae I have purchased and planted four of these vines in my new “native garden” area of the landscape. With spring I hope to see these new plants establish themselves and grow into the oaks, attracting the adult butterflies and creating a new habitat for these beautiful creatures.
 I have done the same by growing a couple of different species of the perennial Asclepias, common name being milkweed. The milkweed is a host plant for the Monarch butterfly, and since I see them here on occasion I‘ve decided to provide this source for both adult and larvae. Once you get to know the butterflies that live in your geographic area then you’ll be able to select the proper plants that will be that source of nectar for the adults and a food source for the caterpillars. Typically these will be native plants since that is what the insects have evolved with.

 I have done the same by slowly constructing water features that are accessible for frogs, toads and dragonflies. We have large areas of ground cover that the toads hide in and hunt through, thus we have provided food, water, shelter and ponds for the young; everything that is needed to sustain the population.
 Birds may nest in nesting boxes, cavities in trees or on the ground in protected locations. Ground nesting birds don’t have enough space on our property to be safe, but birds that will nest in boxes or in trees do have ample places to call home. Be aware that different species of birds will nest at varying elevations above the ground, will prefer a nest box with a certain diameter of entry hole and may even want the box to face south for the warmth of the sun. Get to know the birds that spend spring and summer in your area and the types of terrain they frequent. Bluebirds eat insects and prefer open fields and meadows. Since we have a small open meadow we’ve been fortunate to have nesting bluebirds on the property. We’ve also watched families of nuthatch, wren and acorn woodpecker raise families here. The first two in nest boxes and the woodpecker in a cavity of the large valley oak (Quercus lobata) that grows near the house (the oak is 7 feet in diameter at chest height).
While they do not nest on the property, gray tree squirrels are frequent visitors.
Bats will use the bat house to raise their young, so finding a good location for a few bat houses can give these small mammals a nesting site and in turn help with reducing the mosquito (and other flying insect) population around your yard.
 If your property is large enough you may consider building a brush shelter that will attract chipmunks, lizards, toads and more – a large variety of wildlife. By constructing a dense and heavy brush shelter you’ll probably attract many different animals that don’t feel comfortable in open meadows or polished landscaped gardens.
Place your brush shelter at the edge between tow native habitats – like on the edge between woodland and meadow. If available, use piles of stone along the edges of the brush and even on the interior – many animals like the stone to hide and nest in. Old metal or concrete pipe can be incorporated to act as tunnels for those that like that sort of thing.
To build a brush shelter, start with large logs – anywhere from 6 – 10 feet long and about 4 – 6 inches in diameter. Stack these in a criss-cross manner so that you create passages and spaces. After you have a strong base of 6 or more logs then add on branches in a tighter criss-cross weave and simply continue to add branches of smaller diameter in denser weave. The final product should be about 10 ft. square and about 4- 5 ft. high. Now sit back and see who comes to live there! 
Lastly, maintain your garden in a way that reduces or (preferably) eliminates harmful chemicals from the landscape. Herbicides and pesticides will have a negative effect on all your efforts to create this wildlife sanctuary. Rather than burning fall leaves use them as mulch. Water will be conserved; the leaf mulch will provide homes for worms and insects and also reduces soil compaction while replenishing nutrients.
Look to using native plants whenever possible. Just because its native doesn’t mean that it is low water use – some natives thrive in streams and rivers. But many will do well in garden situations with less water, fertilizers and care than many of the more common variety of landscape plants you find in nurseries. Know the water use of the plant so that, if you’re irrigating, all the plants within that irrigation zone have the same water requirements.
If you’re going to be applying fertilizers then get a soils test first to know what your landscape actually needs, rather than simply throwing out 16-16-16 all over the garden in a shotgun approach! There are many alternatives to the petroleum-based fertilizers on the market today – organic fertilizers and amendments are readily available.
In the long run you’ll have a healthier landscape, a greater variety of wildlife and a safer environment for yourselves, your children and your pets.
Landscaping for Wildlife – Part Three
December 8, 2013
Wildlife Needs Shelter
Well, here we are at Part 3 of our 4-Part article on Landscaping for Wildlife. So far we’ve kicked around ideas for providing both food and water, but after a good meal we all want a place we can relax and feel safe – protected from nasty weather, predators and inquisitive humans (I think this can easily be said of all of us). This is where shelter comes in and it plays a key role in creating the habitat needed for all sorts of critters.
Although I am re-designing a portion of my home landscape to be a native plant garden, I have other areas that I planted out 20 years ago when we moved onto this 1.5 acre parcel simply because I wanted some privacy from the road and neighbors. One of the screening plants I put in was bamboo – both golden and black. Now, before you start criticizing me for planting this invasive hedgerow I’ve got to mention that I keep it in a very narrow band and have found that I can keep it under control very well by not watering it through our long, hot California summers. Bamboo does not like to go thirsty! 
Anyway, this screening of bamboo has turned out to be one of the most popular roosting areas for songbirds in both summer and winter. The White-Crowned Sparrows particularly like this hide-away as does the Dark-eyed Junco (“Oregon” race). They can hide deep inside, it’s about 20 feet tall, and there’s plenty of room for the flock to nestle themselves away. Closer to where I have bird feeders – both a platform feeder and hanging feeders I have Spiraea bushes that tumble across the ground, mounding up to about 3 – 4 feet. The birds will constantly fly or hop in and out of these bushes to the feeders and back. The cover these shrubs provide is critical to the birds feeling safe from cats, hawks and some of the larger birds that frequent the feeders – mainly the jays who always seem to be aggressive. 
Shelter can be provided in many different ways. If your property has a dead tree or two then the cavities that can be found (or hollowed out) will give birds, squirrels, all sorts of animals a place to hide. Both woodpeckers and owls love this kind of home – like the Acorn Woodpecker and Screech Owl pictures on this page.
 Bird houses are another great way to provide shelter. Some birds will use the house simply for a place to sleep while others will build nests and raise their young in them. When either building or purchasing a bird house, know what species you’re trying to attract or keep on the property. Different birds have different tastes when it comes to the size of the entry hole, the size of the box itself and also the height off the ground and direction it faces. We have a shop in town called the Wild Bird Station and the owner is a wealth of information and the feeding and nesting habits of our local birds. Seek out this kind of professional advice before spending a lot of time and/or money on a bird house. Of course, there’s always the internet if you don’t have the time or inclination to speak to a real human being.

If your property is large enough, you may be able to build up some brush piles. Rather than burn the brush come winter, leave them for the animals to take advantage of. Birds will sleep deep within them at night; lizards and toads will burrow in and hide and small mammals will use them for protection from predators. Leave some of those patches of brambles too – the thorns and thick snarl of branches is a great place for wildlife to hide. 
For helping to expand the diversity of wildlife on your property consider planting hedgerows. It’s been done in England and Europe for centuries and there’s lot’s of information on it for us newcomers here in the States.
By building the right types of homes for bats and bees you’ll be able to help control flying insects and have more pollinators for your garden. There are about 4,000 native bees to the United States – and they can all use some help and a home. While the European honey bee is probably the most familiar, they tend to be a bit lazy when it comes to heading into the garden or orchard during inclement weather. Our native bees will be out pollinating when honey bees are still in bed, so check with your local ag agency, Master Gardener or college and see what native bees live in your area and what their requirements are when it comes to shelter. Bumble Bees are another great pollinator to have around. They’re docile, big and fun to watch. I’m extremely allergic to honey bee stings (I meant really allergic) but I love having the bumbles around the garden and they’ve never given me any problems at all.

Bats are another garden visitor you should encourage. Bat houses are easy to build and the number of night-flying insects they eat is staggering – a brown bat can eat up to 1,000 mosquitoes in an hour! But they’ll eat a lot more than mosquitoes, so having them around can help to make a spring or summer evening a lot more pleasant to be out in and enjoy.
Finally, back to ponds and streams – water is the shelter your dragonfly nymphs will use for both home and shelter. Plants will create safe havens for fish, amphibians and insects. Toads will take advantage of rock walls, logs and you can set out toad houses for them to snuggle in when they’re not out hunting.
These are just a few ideas – I’m sure you can think up many more so that your wildlife habitat will provide a safe haven for whoever chooses to come and live – or just visit while migrating through. By providing food, water and shelter you’re fulfilling three critically important components when you’re Landscaping for Wildlife.
Today is Dec. 8, 2013. On the night of the 6th we had a cold storm blow through that left 4 inches of snow here at the house (2,000 ft. elevation) and temperatures dropping into the teens (Fahrenheit). The food, water and shelter we provide was (and is) greatly appreciated by the birds and squirrels who visit our garden, such as this Spotted Towhee pictured below.

Landscaping for Wildlife – Part 2
December 6, 2013
This is Part Two of our 4-Part article on Landscaping for Wildlife. In addition to supplying food to supplement any natural sources on your property you also need to provide clean water. Water will be used for drinking, bathing and for reproduction. Even in cold weather birds will want to splash around a bit in shallow water.
Of course the easiest way to supply clean water is to set out a bird bath. This is great for, well….birds. And squirrels. The water does need to be kept fresh, so you should change it out every 2-3 days in warm weather. The animals will be using it more often in the warmer weather and algae will tend to grow in the bird bath unless it is changed regularly. In the depths of winter be prepared to haul out some hot water in the mornings to thaw out the bath so whoever is using it can access something besides ice.


While a bird bath is great for birds and squirrels keep in mind that there are other animals living within your new wildlife habitat. In Part One we mentioned some of these other residents – frogs, toads and insects. Reptiles may also become part of the garden and lizards and snakes will be looking for a drink of water too.
A backyard pond is easy to design and create and will help to provide a great diversity of life to your new habitat as well as both some entertainment and education for the whole family. When planned for and built correctly you should end up with a balanced pond ecosystem that will not create a mosquito haven while attracting more beneficial insects to the garden. You do this by designing a water feature with a variety of plants and animals that work together to create and maintain this healthy ecosystem environment.
So, here are a few tips to help you design your water feature properly. There are many different ways to actually construct the pond – whatever the size may be. For our purposes we’ll look at smaller backyard ponds or water features that you as a homeowner could build yourself. Using flexible pond liners is the easiest way to build a feature that won’t leak. If you have very stony ground or lots of roots consider installing an underlayment first. This can be a soft, cushioning material – almost like a heavy felt – to protect the rubber liner or you may even pour a skin of concrete to lay the liner over. Either way, you want to be sure that nothing can poke a hole in the liner – leaks are tough to locate!
Don’t have your pond just drop off with a cliff-like edge. A shallow entry leading to deeper water gives visitors the means to enter and exit the water easily. It can double as an area for butterflies to “puddle” and can also be an area to set shallow-water aquatic plants. Birds will appreciate the shallow water too – a perfect place to bath and splash about. If you’re going to place rocks or boulders be sure to have them on top of the liner and give them a solid, stable surface or ledge to rest on so they don’t tumble into the water and possibly tear the liner.
If you’re going to incorporate a flowing stream-bed into your water feature then design it so that boulders and plants hide the “source”. This way it will appear more natural (how often do you see where the stream bubbles out of the ground when hiking?) and limit the variety of plants along the stream edge. When you view creeks in nature you’ll see a gradual transition of plants from close to the water where the soil is saturated up onto higher and drier ground. Mimic this idea with your stream and you’ll add to the natural feel you’re going for.
Over time you’ll get a variety of wildlife inhabiting your pond and stream and some of this variety will depend on how much sun and shade it receives. Watch the sun and shade patterns of your property and position your water feature where it will receive direct sun though parts of the day but will also get some cooling shade. This will make the stream and pond more enjoyable to watch as you’ll see the light and shadows play on the water.
So, what else do you need to maintain the stream/pond in a healthy condition? Having a pump and filtration system will help keep the water moving and aerated. Birds are attracted to moving water, hummingbirds will dart to waterfalls to get a drink (I’m not talking Niagara Falls here – keep everything in proportion!) and the movement will work to prevent mosquito larvae from becoming a problem.
Gravel and small cobbles on the bottom of the stream-bed will create a natural filtration and give aquatic insects a place to live and hunt and hide. Amphibians like a gravelly bottom with larger rocks or a log or two to hide under or bask on. Pour a bucket of water from a natural pond or lake in your new feature and it will introduce thousands or even millions of organisms that will help to keep everything in balance.
The depth of the pond can be determined by where you live. The colder your climate the more likely the pond will freeze to the bottom – not good for plants or aquatic wildlife. In cold climes you’ll need a deeper pond and by keeping a pump running then freezing shouldn’t be a problem. Minimum depth should be around 24 inches. The more sun and the shallower the pond the harder it will be to keep algae from growing, even with a re-circulating pump running.
Other beneficial insects that require water are dragonflies and damselflies. The nymphs of both species rely on water and will live underwater for months and sometimes years before they mature into adults. The adults typically hunt over water (although I’ve watched them hover and grab emerging flying ants far from any water source) and they’ll lay their eggs either in the water or on plants close by. Create the proper conditions and you’ll attract these insects to your wildlife habitat. If you already live near a lake, pond or stream then dragonflies and damselflies probably live close by, so they’ll find your water even faster. 

As I mentioned above, the depth should be 24 inches minimum. This will give the dragonfly nymphs more room to hide from predators like birds or raccoons. Always vary the depth of the pond, keeping that shallow beach-entry at the edges and dipping into deeper water. The different depths will give you the opportunity to have some different plants within the pond as well. Nymphs will use the plants to rest on, hide within and as a launching point when hunting for food. Plants that emerge above the surface will give nymphs that are turning into maturing dragonflies something to crawl out of the water on as they transform from a water environment to flying adults. The plants also provide a perch that adult dragonflies and damselflies can rest on while hunting for their food. Keep sedges and rushes growing along the edge of the pond – that will give the adults additional perching spots and even some small shrubs will be appreciated. 
These insects do like to warm themselves in the sun – by setting some large flat stones near the water they’ll be able to light and refresh themselves. Regarding fish – be careful with what you introduce. Small mosquito fish are probably okay, but gold fish or something larger will eat the eggs and young of many insects, frogs and toads.
Even a small pond can be a fair amount of work and a walk through the phone book will lead you to landscape contractors or specialty businesses that can design and then build water features professionally for you.
Whatever the size of your landscape a water feature – whether it be a simple bird bath or a more involved and complex stream and pond – will provide the clean, fresh water visiting wildlife requires and it’s the second ingredient when it comes to landscaping for wildlife.
Landscaping for Wildlife
December 4, 2013
This is the first of four blog posts on creating habitat for wildlife on your property. I’ve recently been certified (no jokes please) a Wildlife Landscape Professional with the National Wildlife Federation and our property is now Certified Wildlife Habitat with the NWF. In light of all this I thought I’d share some of the things I’ve learned while going through this process.
PART ONE – PROVIDE FOOD
Just like us, wildlife needs to eat. If providing for birds is your goal, then supplying hanging feeders is the simplest way to have food available for them when natural sources aren’t available.
 Before you start hanging feeders do some research and get to know what birds live in your area at different times of the year. Different species of birds prefer varying types of feeder foods, and while some birds like hanging feeders, some prefer to eat off of platforms. Be aware that many birds migrate, so you’ll get different species throughout the seasons. As time goes by you’ll probably attract birds you weren’t even expecting.
Use a seed blend designed for your feeder and the types of birds you feed. Blends that contain seeds and grains such as sorghum, and red or golden millet are not typically eaten by birds, and these will often end up on the ground. Black oil sunflower seed however is a favorite of just about every seed-eating species.
Black Niger seed is a favorite of the American gold finch. They also love to eat sunflower seeds – so planting sunflowers will provide a natural choice for them while bringing color to your summer garden. 
Suet feeders are a favorite of woodpeckers and other insect-eating birds, including jays. You can buy blocks of suet from wild bird stores, many hardware stores and even some supermarkets. Typically, suet blocks are placed in a wire cage that hangs on the side of a tree away from squirrels. Avoid putting suet out in hot weather as it will go rancid.

Some birds eat fruit, so by planting shrubs that provide berries and fall fruit will attract them into your garden. I’ve watched Cedar Waxwings eat their way through persimmon orchards as well as eating the wild toyon (Heteromeles arbutifolia) berries in my landscape.
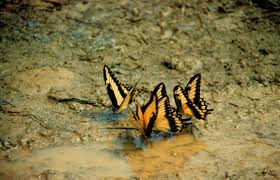
Brightly colored butterflies can be a welcome addition to your wildlife garden, not only because of their beauty, but also because of their usefulness in pollinating flowers.
Attracting butterflies involves incorporating plants that serve the needs of all life stages of the butterfly. The insects need places to lay eggs, food plants for their larvae (caterpillars), places to form chrysalides and nectar sources for adults. 
Butterfly Garden Necessities (from NWF website)
- Plant native flowering plants – Because many butterflies and native flowering plants have co-evolved over time and depend on each other for survival and reproduction, it is particularly important to install native flowering plants local to your geographic area. Native plants provide butterflies with the nectar or foliage they need as adults and caterpillars. The Lady Bird Johnson Wildflower Center has lists of recommended native plants by region and state.
- Plant type and color is important – Adult butterflies are attracted to red, yellow, orange, pink and purple blossoms that are flat-topped or clustered and have short flower tubes.
- Plant good nectar sources in the sun – Your key butterfly nectar source plants should receive full sun from mid-morning to mid-afternoon. Butterfly adults generally feed only in the sun. If sun is limited in your landscape, try adding butterfly nectar sources to the vegetable garden.
- Plant for continuous bloom – Butterflies need nectar throughout the adult phase of their life span. Try to plant so that when one plant stops blooming, another begins.
- Say no to insecticides – Insecticides such as malathion, Sevin, and diazinon are marketed to kill insects. Don’t use these materials in or near the butterfly garden or better, anywhere on your property. Even “benign” insecticides, such as Bacillus thuringiensis, are lethal to butterflies (while caterpillars).
- Feed butterfly caterpillars – If you don’t “grow” caterpillars, there will be no adults. Bringing caterpillar foods into your garden can greatly increase your chances of attracting unusual and uncommon butterflies, while giving you yet another reason to plant an increasing variety of native plants. In many cases, caterpillars of a species feed on only a very limited variety of plants. Most butterfly caterpillars never cause the leaf damage we associate with some moth caterpillars such as bagworms, tent caterpillars, or gypsy moths.
- Provide a place for butterflies to rest – Butterflies need sun for orientation and to warm their wings for flight. Place flat stones in your garden to provide space for butterflies to rest and bask in the sun.
- Give them a place for puddling – Butterflies often congregate on wet sand and mud to partake in “puddling,” drinking water and extracting minerals from damp puddles. Place coarse sand in a shallow pan and then insert the pan in the soil of your habitat. Make sure to keep the sand moist.

What attracts butterflies will also attract bees – both the honey bee and our native bees. As with butterflies, eliminate the use of pesticides and herbicides in your garden – bees are very sensitive to these chemicals.
Finally, don’t forget frogs and toads in your new wildlife habitat. Both are great hunters, with toads foraging throughout the garden at night eating up insects and other small pests. And the sound of frogs on a summer evening is music not to be missed. To attract toads you’ll need to create the proper habitat for them. Toads are a tasty treat from many other animals – snakes, birds, even the occasional house pet will kill and eat toads. Provide plenty of ground cover foliage and slightlyelevated areas where they can be safe. 
Toads are amphibians, so they need moisture. While not tied to water as closely as frogs, they still need these moist places to live in and to lay their eggs. Toad tadpoles will grow up in small ponds or ditches. Keep these filled with water and you’ll ensure future generations of toads in your garden. Toads are predators and will eat snails, spiders, worms, slugs and other invertebrates. As tadpoles they eat plants.
Toads like to hide and I’ve had them burrow into rock walls and behind timber retaining walls where it’s safe, dark and damp. You can even add a toad house to your garden
Back to getting rid of herbicides – glyphosate – the chemical in Round-up is deadly to frogs and toads – both the adult and the tadpole. Please don’t use it in your garden and never where it can drift into ponds or streams!
Attracting wildlife doesn’t stop here – a healthy garden will include those “good bugs” that do a lot of good work. The diet of these bugs consists of a lot of the “bad bugs” – the ones that eat and damage our garden plantings. All insects have plants that they need for food and shelter; you’ll want to intersperse these plants throughout the garden so these beneficial insects will be close at hand when they’re needed.
To keep these good bugs around, don’t use pesticides – let them do the control for you. Even if you try to avoid the areas where the beneficial live it’s still easy for chemicals to drift on a light breeze and cause a lot of harm!
Some “good bugs”:
Lady bugs (Lady Bird Beetle) – Most recognized when adults by their bright orange with black spots, it’s the larvae that eat the most pests. They love aphids! Eggs are yellowish in color and are laid on the bottom of the leaves.
Plants that attract ladybugs include:
| Achillea filipendulina Fern-leaf yarrowAchillea millefolium Common yarrow
Ajuga reptans Carpet bugleweed Alyssum saxatilis Basket of Gold Anethum graveolens Dill Anthemis tinctoria Golden marguerite Asclepias tuberosa Butterfly weed Atriplex canescens Four-wing saltbush Coriandrum sativum Coriander Daucus Carota Queen Anne’s lace Fagopyrum esculentum Buckwheat |
Foeniculum vulgare FennelHelianthus maximilianii Prairie sunflower
Penstemon strictus Rocky Mt. penstemon Potentilla recta ‘warrenii’ Sulfur cinquefoil Potentilla villosa Alpine cinquefoil Tagetes tenuifolia Marigold – lemon gem Tanacetum vulgare Tansy Taraxacum officinale Dandelion Veronica spicata Spike speedwell Vicia villosa Hairy vetch |
Another great bug to provide for in the garden is the Lacewing (Chrysopa spp.)
Beautiful, delicate little insects either green of brown with large lacy wings. The eggs are laid on the end of inch-long stiff threads. The larvae are ravenous and eat the bulk of the pests. Another name for them is the aphid lion, but they’ll eat mites, other small insects and insect eggs. You’ll often see them on your windows or screens on a summer evening, attracted by porch or house lights.
Plants that attract lacewings:
| Achillea filipendulina Fern-leaf yarrowAnethum graveolens Dill
Angelica gigas Angelica Anthemis tinctoria Golden marguerite Atriplex canescens Four-wing saltbush Callirhoe involucrata Purple poppy mallow Carum Carvi Caraway |
Coriandrum sativum CorianderCosmos bipinnatus Cosmos white sensation
Daucus Carota Queen Anne’s lace Foeniculum vulgare Fennel Helianthus maximilianii Prairie sunflower Tanacetum vulgare Tansy Taraxacum officinale Dandelion |
Hoverflies are another great friend of the garden. Adults look like little bees but they don’t sting – they hover and dart quickly away if you come near. Their eggs are white, oval and laid singly or can be in groups on leaves. The larvae (maggots) can be green, yellow, brown, orange or white and are about ½ inch long. They look like little caterpillars and they’ll rise up on their hind legs to catch and feed on aphids, mealy bugs and other small insects.
Good plants for hoverflies include:
| Achillea filipendulina Fern-leaf yarrowAchillea millefolium Common yarrow
Ajuga reptans Carpet bugleweed Allium tanguticum Lavender globe lily Alyssum saxatilis Basket of Gold Anethum graveolens Dill Anthemis tinctoria Golden marguerite Aster alpinus Dwarf alpine aster Astrantia major Masterwort Atriplex canescens Four-wing saltbush Callirhoe involucrata Purple poppy mallow Carum Carvi Caraway Chrysanthemum parthenium Feverfew Coriandrum sativum Coriander Cosmos bipinnatus Cosmos white sensation Daucus Carota Queen Anne’s lace Fagopyrum esculentum Buckwheat Foeniculum vulgare Fennel Lavandula angustifolia English lavender Limnanthes douglasii Poached egg plant Limonium latifolium Statice |
Linaria vulgaris Butter and eggsLobelia erinus Edging lobelia
Lobularia maritima Sweet alyssum – white Melissa officinalis Lemon balm Mentha pulegium Pennyroyal Mentha spicata Spearmint Monarda fistulosa Wild bergamot Penstemon strictus Rocky Mt. penstemon Petroselinum crispum Parsley Potentilla recta ‘warrenii’ Sulfur cinquefoil Potentilla villosa Alpine cinquefoil Rudbeckia fulgida Gloriosa daisy Sedum kamtschaticum Orange stonecrop Sedum spurium & album Stonecrops Solidago virgaurea Peter Pan goldenrod Stachys officinalis Wood betony Tagetes tenuifolia Marigold – lemon gem Thymus serpylum coccineus Crimson thyme Veronica spicata Spike speedwell Zinnia elegans Zinnia – liliput |
There are so many beneficial insects that we can’t cover them all here, but we can’t finish without mentioning the Praying Mantis (or Praying Mantid, as some refer to it). Praying Mantis are hunters and there are lots of different species. They share one thing in common – they are carnivores! Most are light green or brown they’ll eat aphids, flies, leaf hoppers, bees and crickets. Actually, they’ll eat just about anything they can catch – in the tropics they grow large enough to catch lizards and hummingbirds! 
They like organically grown gardens – again, stay away from those pesticides – and seem to like plants in the rose and raspberry family. They also like grapes, wisteria and tall grasses where they can find shelter. If you have Praying Mantids then you’ll also have other bugs that they will feed on.
So, to create a sustainable habitat for wildlife in your garden be sure to provide a food source. Whether it be hanging feeders for birds or a chemical-free hunting ground for frogs, toads and beneficial insects. You’ll have a healthier landscape and a lot of entertainment right outside your window.
In my next blog I’ll be covering the importance of water as we create our habitat for wildlife.
Thanks for reading!
8 New Garden Trends to Make Yours Standout Worthy
October 7, 2013
This is our first guest post by freelance writer Marcela De Vivo, I hope you enjoy it as much as I have.
You might think that garden style is eternal, but it’s as subject to change as fashion…or even the seasons. This year, gardeners from around the world are exploring new looks (and feels!), materials, and even philosophical approaches to gardening, so whether it’s a matter of experimenting with a new plant or a head-to-toe overhaul, you should find at least one fad here to meet your budget and commitment level.
1. Harvest Bouquets: Beyond Flowers
This year, gardeners are burying the notion that a bouquet should be an arrangement of traditional blossoms only and branching out into unconventional bundles that include things that would normally end up on the dinner table. Some of these are previous crossovers, such as the lovely flowering cabbage and squash blooms, but adventurous potting-Picassos are turning to eggplants, radishes, and even string beans to spice things up. And here’s yet another reason to get excited about kale.
2. The Touchy Feely Garden
If the arrangement styles above look good enough to eat, this season gardeners will be embracing “hands-on” planting choices that literally feel good. The fluffy pussy willow (Salix capreas), the soft, fairy-tale like mounds of Scleranthus uniflorus, or the highly strokable perennial grass Pennisetum all seem made to be touched (these are therefore all great touches for kid-visited gardens). In short, experiment with any willows, long grasses, ferns, and mosses.
3. The New Waldens
Over the last few years, gardeners everywhere have taken to heart a Thoreau-like self-reliance and sufficiency with their spreads, creating layouts that yield usable products, take up less space, and conserve water. This “homesteading” approach not only means innovative ways of squeezing more plants and vegetables into an economical plot –remember the traditional Native American “three sisters” plotting of corn, beans, and squash? — but also finding ways of preserving your bounty to last well beyond harvest time.
4. Going Recycled
At a time of still-wobbly economics and a green-or-bust ecology, it’s no wonder the look of recycled furniture and accessories has moved from Bohemia alone to more mainstream homes and backyards. From old rusty metal to weather-worn wood to even more daring accents (bicycle wheels, car parts), junked materials can give your garden that hint of run-down rustic charm. Further tip: hit nearby galleries as well as the scrapyard to support local artists who work with re-purposed media.
5. Narrative Tableaux
If plopping down a few rock sculptures doesn’t satisfy your art-tooth, this season it’s okay to run wild with big, splashy themes that will envelop your garden with story. You can run with a fully developed story world, using classics such as Through the Looking Glass, The Chronicles of Narnia, or even Edward Gorey’s The Evil Garden as a jumping off point, or just drop hints of another world. If you’re already playing with old metal objects, for example, invoke a steampunk world into your backyard.
6. Themed Walls
If your garden involves trellises or planting boxes on the side of a structure, think about incorporating the adjoining wall into the look and energy of the flora and landscaping that abuts it. A simple one-color paint job can make the hues of your flowers pop, for example. If you’re a bit more ambitious, a trompe-l’oeil mural of vines will be a true conversation piece.
7. Water Wonderland
Truly classic designs never go out of style — or at least they keep coming back in every season — and perhaps nothing is more iconographic for a garden than a gently rippling water fountain. While some people may be scared off by the logistics of installation, there are many relatively hassle-free outdoor fountain kits with looks ranging from the Oriental to the post-modern.
8. Community Gardening
Accompanying the growing sea change in conserving resources, we’re also seeing people emerge from behind the picket fences to join in neighborhood collective gardens. Not only are shared gardens a great way to grow a community, they’re a great means of manifesting large-scale designs that might be daunting to an individual. Additionally, they might be the only way for city and apartment-dwellers to engage their green thumbs.
These are just a few emerging trends, so keep your eyes open for new ideas around you. Remember, an essential joy of creating a garden space is that it’s always a work in progress, so you can perpetually stir in new ideas as time goes by. Most of all, run with your whims and never be afraid to get your hands dirty.
Marcela is a freelance writer from Southern California. She enjoys gardening and can’t wait to try out some of these new trends on her own garden. She currently writes for Soothing Walls. Follow her on Twitter!
A STUDY IN SCARLET…
June 13, 2013
“You don’t seem to give much thought to the matter at hand,” I said at last, interrupting Holmes musical disquisition.
“No data yet,” he answered. “It is a capital mistake to theorize before you have all the evidence. It biases the judgment.”
And so one of the great stories of detective fiction, Sherlock Holmes, develops. So, how much of our landscaping practices theorize before we have all the evidence? Judging from a recent experience with a landscape contractor and developer, quite a lot! 
I’ve talked about our Water Efficient Landscape Ordinance in previous articles but this time I have some first hand experience “in the field” that I think is of some interest. Does implementing this ordinance cost money? – sure it does. It’s a bloody lot of work come right down to it. And it needs to be justified, both for the client and, I would think, for ourselves. After all, if we don’t understand it and can’t explain it then we’re going to have a hard time selling the benefits. I imagine this won’t be particularly new to many reading this, but still, here is my little story…..
First off, not all communities in California enforce the ordinance and that makes it frustrating for clients who work over larger geographical regions where WELO may be adhered too within City limits but not within the County that the City is in. Still, it is what it is.
So I was approached by a contractor who needed some help with a planting plan – it needed some water use calcs. and I was able to complete that for him. What I didn’t know at the time was that a full WELO package was going to be needed and neither did the contractor. Apparently the developer didn’t know either. The plan was a bit sketchy as to quantity of individual plant species, it had a bit of a ‘shotgun’ approach that, as it turned out, needed to be refined.
With commercial projects a landscape architect needs to sign off on the WELO package and that is how I got involved. It came down to doing an entirely new planting plan with plant list and specs (what should have been done to begin with) and an irrigation plan zoned so that would complement the water use needs of the plants selected. The planting plan needs to delineate hydrozone boundaries. A soil analysis needed to be completed as well, and this involves taking samples at the site and having a soil lab do the required tests – fertility, texture and infiltration rates. I found all of this to be pretty darned interesting myself, but he developers were scratching their heads a bit.

They’d had a soils test done by their engineer – but this was for structural purposes – not landscaping. They’d paid for a landscape plan (from the contractor) that needed to be scrapped and re-done. They needed to pay for another soils test (not much, $62.00 + my fee for doing the leg work). Costs were slowly adding up.
Now back to the statement by Sherlock Holmes at the beginning of this piece.
“No data yet,” he answered. “It is a capital mistake to theorize before you have all the evidence. It biases the judgment.”
Without the soil report the installing contractor would be applying fertilizer and amendments in a ‘shotgun’ approach without having any concrete data as to what the soil actually needed. Without knowledge of an infiltration rate scheduling would not be accurate and water would very probably be wasted. Without adhering to plants being grouped into hydrozones then over and/or under watering would undoubtedly occur. 
When I started in this business the scenario went like this – 6 cubic yards of nitrified wood mulch rototilled into the soil (generally after the irrigation went in, thus keeping a deep till from happening) and a handful of granular fertilizer tossed into each planting hole and that was it. Sometimes no general tilling – just dig a hole in compacted soil and throw in a shovel full of mulch and a handful of fertilizer – hole not quite deep enough? Hack the roots off. This is how it was always done and it wasn’t going to change. No data to go on, but what the heck, we made good time.
The Ordinance can be justified – it builds the tilth of the soil (feed the soil, not the plant); it deliberately groups plants together based on water use needs; it requires irrigation scheduling based on ETo, soils and through the use of smart controllers. It saves water, energy and money.
Once I explained (justified) the Ordinance to the developer they agreed. Education is the key, education with a solid explanation as to why something works.
Ok, enough.
Next time I hope to have a few more photos of the transformation of my back lawn into a native plant garden with water, host plants for caterpillars and nectar plants for butterflies and bees – and bird feed tables here and there.
Thanks,
Rob
10 Easy Steps…….
May 30, 2013
…….To Efficient Irrigation Design
It’s the 30th of May, 2013 and we’ve probably had our last rain of the season, now for the long dry California summer to settle in on us. We’ve topped out here in Applegate with about 32.90 inches of rain since last July first. With water rates going up now is the perfect time to review existing and proposed irrigation systems and make sure you’re using your water as efficiently as possible. And so with that in mind I’ve created a punch-list of 10 easy steps to achieving this goal. Some of this stuff is, what I would call, a “no-brainer” but drive around town and chances are there will be plenty of examples of the “no–brainer” being either the installing contractor, the gardener or the homeowner and how they mismanage the water system.
Step 1. Know your soil. What’s its texture? What is it’s water-holding capacity? What’s its organic matter content? What’s its infiltration rate? These are crucial parts of the puzzle when it comes to selecting an application method and run time. A couple of ways to determine texture. 1) do a jar test. Take some representative samples of the soil down about 6 – 8 inches and plop it in a mason or peanut butter jar. Add water and shake. Let it settle. The sand will settle out in a couple of minutes or less; the silt will settle out over the next couple of hours and the clay will take about 24 hours give or take a bit. Some will stay in suspension indefinitely. Now, measure the total depth of the sample and then the depth of the individual layers of sand, silt and clay. Determine the % of each layer by dividing the layer depth by the total depth. Google “Soil Triangle” and print out one that looks good to your eye. In most cases you’ll be able to determine your soil texture from this simple test. 2) This second way is to take this same original sample and, rather than doing your own test, send it off to a soil testing lab. For around $30 – $80 (prices will vary depending on the extent of the testing) you’ll get loads of information on texture, infiltration rates, fertility and you can get the labs comments/recommendations on improving your soil.

Step 2. Know Your Site. What is your daily/monthly/yearly ET rate? Which direction does your garden face – North, South, East or West? All 4? Any micro-climates that need to be considered? Again, these are elements that will come into play – especially your ET (evapotranspiration) rate. This information is readily available through State or University websites. In California we have CIMIS – California Irrigation Management Information Service. You sign up for it on-line, it’s free and it gives you tons of weather data for your location. The aspect (direction) of the garden tells you how much, or little, sun may hit and that will affect applications methods and sprinkler run times.
Step 3. Develop a Plan. OK, this is one of those “no-brainers” I spoke of earlier, but think about it. How many times have any of us (and certainly homeowner DIYers) run down to the nursery and bought one of every plant available with no idea of where they’re going to be planted or what their individual requirements are? The plan doesn’t have to be super sophisticated, but it should at least give an idea of what the garden will eventually look like. This is where a little research will go a long way. Group plants together based on water requirements as much as on aesthetics and purpose. A plan can be a simple as a bunch of free-form shapes labeled with Low, Medium and High referring to the water use of the plants that will be in that region. This starts to set the stage for proper zoning of the irrigation system and, consequently, efficient use of the water. Not sure of what the water use is for a selected plant? For California we have the Water Use Classification Of Landscape Species (WUCOLS) to use. Again, Google it. Currently it’s being revised, updated and expanded. If you don’t have anything like this where you live talk to your local nursery or garden center (find one where the employees actually know something!).
Step 4. Know Your Water Source. How much water you have available to use is pretty critical as to how many valves you may end up needing to use. If you’re on a meter then what size is it? The size should be stamped on the meter itself – 5/8″; 3/4″ etc. If you’re in Canada or Europe then maybe it’s metric, doesn’t matter. You can only push so much water through a meter and your local water agency or utility will help you to determine that flow rate. Let’s say you’ve got a 5/8″ meter. Well, it has a flow capacity of 20 gallons per minute (gpm) but realistically and from a safety standpoint you should only push 75% of the capacity through the meter. So a 5/8″ meter would provide 15 gpm. This same criteria should be applied if your water source is a private well. If your well puts out 12 gpm then design your system to use no more than 9 gpm – this leaves some for the house and for any possible fluctuation in the flow capacity of the well.
Step 5. Spray the Lawn; Drip the Shrubs. Drip, or micro, irrigation is much more efficient than spray and shrubs tend to block the spray pattern on sprinklers. Don’t use “Leaky Pipe” (that spongy hose tube stuff) unless you aren’t interested in watering efficiently. Most turf is a High Water Use plant – keep this in mind when designing a water-efficient landscape. So this is a pretty straight-forward statement and the thing is, it works. 
Step 6. Give The Plants The Water They Need and No More. So how much water do your plants need? That’s going to depend on some factors. 1) Are they low, medium or high water use? this information is available through WUCOLS or your local garden center. 2) What is the climate they are growing in? (a Ceanothus growing on the coast will require less water than one growing in our hot inland valleys). But it’s not just the climate, find out what the ET rate is for your area. As water evaporates from the soil and the plant the available water in the soil is depleted. This is what needs to be replaced to help keep your plants healthy. The ET rate will vary throughout the year and so will the water needs of the plant. Your local agricultural extension should have this information or use CIMIS. 3) How deep do the plant roots go? If your plants roots grow 12 inches into the soil then there isn’t much reason to irrigate long enough that the water percolates down to 18″ or more – the plant can’t use it and so in essence it’s being wasted and that’s not efficient. 4) How fast does the water soak into the soil? Knowing how fast the water infiltrates the soil will tell you how long to let the water run in order to get the moisture into the root zone. Many controllers now have a “Cycle and Soak” feature that allows you to run the water for a short time, let it soak in and then water again and this helps to prevent run-off. Use a soil probe to see how fast and deep the water moves.
Step 7. Mulch. Pure and simple; 2 – 4 inches of mulch saves water and moderates the temperature of the soil keeping roots cool. Know your plants! Some plants like organic mulch while others, like lavender and dianthus, like gravel or decomposed granite.

Step 8. Install a Smart Controller. Every manufacturer of irrigation equipment has this style of controller. How much do they cost? (there’s a saying in racing – “speed costs money – How fast do you want to go?”) Check with your local irrigation supplier and have them explain the different options and features.

Step 9. Monitor Your System. Even the best designed system needs to be watched. Don’t just set it and forget it because if something can go wrong it will. Walk around once in a while and watch how everything is working, that there are no leaks or breaks in the system and if there is a problem repair it as soon as possible.
Step 10. Look for a class on irrigation design and/or installation. A couple of hours can offer up a wealth of information on this topic. Whether an on-line course or a ‘brick and mortar’ classroom – choose what works best for you.
…And Now For Something Extra
This is my backyard. It’s pretty much the last bit on our 1.7 acres that needs a new design. So, over the next month or two I’ll be documenting the transformation of this small bit of ground from the lawn as it is now to a new, water-efficient landscape. I’ll be getting progress photos from these locations throughout the project. I took these a bit early in the day – the next set will be better.


My goal: Create a native plant, low water use garden with places to sit. Plants that are food sources for butterflies and bees as well as have the host plants needed for butterfly and moth caterpillars. Eliminate all lawn. Provide water and feeding stations for birds. Convert from spray irrigation to drip. Do all of this organically – no herbicides or pesticides allowed. A couple of butterflies I want to attract are the anise swallowtail (larvae on fennel in my garden) and the Pipevine Swallowtail (larvae on a pipevine in the American River canyon)
I hope you’ll stick around and see how this idea works out, 
thanks,
Rob
Are You A Dinosaur in the Garden?
May 28, 2013

or, The Evolution of a Species
Anyone who knows me knows I’ve never been a huge fan of …..Technology.
After all, I still use a 1930’s rotary telephone in our house (please refer to the photo for those who are not familiar with this earlier form of communication) . In fact, we have two rotary telephones.
So, what has this got to do with landscaping and gardening?

Plenty.
Just like our friend Godzilla I’ve been reluctant to change many of my ways. I always have plenty of arguments and reasons and I know I’m probably a fairly lone gardener in this circumstance and that’s where the Evolution of a Species line above comes from. For years I’ve done the bulk of my plans with paper, pen and ink although I once knew both VectorWorks and AutoCAD. I even used them on occasion. But for me there’s just something satisfying about hand-drafting that I’ve always enjoyed. I mean, Frank Lloyd Wright drew the plans for Falling Water in pencil (see – an argument). Of course what I didn’t want to admit is that if CAD had been around when he drew those plans he would have been all over it. Frank was no dinosaur.
So, now that I’ve started developing on-line courses in design and irrigation all I could see was “Death By PowerPoint” looming it’s ugly head – at least high enough that it could get chopped off (and hey – this is my head we’re talking about). My solution? Evolve. Now the classes are developed around a SmartBoard – an interactive white board that engages to a far greater degree. The office is being re-designed into a film studio where I’ll (reluctantly) go on camera – at least for the introductions to the various courses. I purchased an iPhone4 (still scratching my head a bit on this one) and I’ve started using CAD again in my design work.
As gardeners, designers and architects our being able to download and use some of the apps for plant, bird and insect identification can be a great help when providing services to our clients. And there are apps where you can manage and control your (or your clients) irrigation system from your iPhone or iPad based on real-time weather and ET data. Even I have to admit this stuff is pretty cool.
Last night we had 0.35 inches of rain and this will probably be the last of the rains for months to come. Fortunately my SMART irrigation controller knows what to do and that leaves this dinosaur some time to get out and take the dogs for a walk – without the iPhone!
 See you soon,
Rob
Water Efficient Landscapes Come of Age
May 12, 2013

It’s May 10, 2013 and pushing into the mid-80’s. Although we’ve had 3/4″ of rain earlier this week we’re still at the lowest rainfall in the past 5 years with 31.5 inches since last July 1. Last year we were at 39+ inches by now and the year before over 71 inches.
Snow pack and water content in the Sierra Nevada Mtns. low to nothing and already there are fires throughout the State. It’s going to be a long, dry Summer.
It used to be that water efficiency meant turning off the sprinklers when you saw water running down the gutters but now it’s taken on a deeper meaning. Enforced or not, the Water Efficient Landscape Ordinance is here (AB 1881) and water rates are continuing to rise. Irrigation allotments to farmers have been cut and the State is on track to have water meters installed throughout Calif. within a few years. The era of cheap water is coming to an end.
When I talk to students and clients about water efficiency and AB 1881 some of the first reactions are that of Big Brother telling us what or what not to do with our water – this isn’t the case. Think about it – how many times have any of you driven through neighborhoods and seen water flowing down the sidewalks? or broken sprinklers acting more like geysers than the even distribution devices they are supposed to be? I’ve seen this plenty of times. I found a broken drip line in my landscape last night allowing water to run down the driveway rather than into the planting beds. It’s simply a waste.
Water efficiency is like your weekly or monthly paycheck. You live on a budget (well, some of us do) and you conserve (save) some of your paycheck by depositing it in savings, an IRA or a checking account. It’s the same with our water – rather than waste this resource it’s a way to conserve so there’s (hopefully) enough for all.
If you’re already on a meter you know how much you spend on water. According to the EPA WaterSense website an average family of 4 uses around 400 gallons of water each day, and approx. 40% of this is used in the outdoors – that’s 160 gallons of water each day! And some folks use a lot more than this estimate. Add it up and that’s a lot of water! And an awful lot of this water is wasted or used inefficiently.
When having a new landscape installed or retrofitting your existing landscape it’s a good idea to have a sub-meter installed that can track how much water you’re actually using in the landscape. They’re not expensive – about $80.00 – and as long as you have a single point of connection to your irrigation system then this simply installs and tracks your usage. Also the use of Smart controllers – controllers that track the weather, can save a lot of water. Every manufacturer offers these controllers and in California AB 1881 requires it. I’ve got one and now I don’t have to worry about the sprinklers or drip coming on when it rains or freezes. It adjusts the run times based on temperatures so it runs more in these hotter summer months and less (or not at all) in the winter. You still have to set up the initial program and walk the system to be sure there are no breaks or leaks, but you should be doing this anyway. I’m on a well and the more efficiently I use my irrigation the less electricity I’m paying for. I save water and I save money.
There are some great workshops that can help you learn how to be more water conscious. One such program is the Green Gardener Training – there’s one for homeowners and one for professionals. These 10 week programs teach you about composting, mulches, irrigation and proper design, soils and pests – including IPA. Another is the Qualified Water Efficient Landscape (QWEL) training. This is a 21 hour course covering water use all the way from what your watershed is to doing an irrigation audit to find out how effective and efficient your irrigation system is and for those who pass the final exam you are eligible to apply to be an EPA WaterSense Partner. While neither of these programs are offered in every state right now they are growing. And if you’re a teacher or just plain interested you can help get this training established in your area. I teach QWEL and landscape irrigation audit courses at my Applegate studio and will soon have an on-line irrigation design class to help in promoting the wise and responsible use of our water.
So, back to the title of this article (remember – this isn’t a blog – I hate that word!) Water Efficient Landscapes Come of Age, as the cost of water, (really it’s the infrastructure – moving the water around – that really costs the money) increases we’re all going to want to have a greater awareness to how we’re using it. California’s population right now is around 38 million people. Projections show that by 2049 we’ll pass 50 million and by 2060 be around 53 million people. With limited water resources, smaller snow pack that has less water content (this year’s water content was 17% of normal and the snow melt supplies 1/3 of our State water) and with January and February hitting a record dry, the State Water Project will only be delivering 35% of requested amounts. The SWP supplies water for 25 million Californians and for about 1 million acres of agricultural use.
So does this sound like a resource we want or can afford to waste? And it’s not just our drinking water, landscape and agricultural use – it’s also recreational and ecological concerns that we need to include.
The days of cheap water are coming to an end. We need to use our water wisely and we need to be doing it starting now. If you can convert your spray irrigation system to drip then do it. Drip has an efficiency rating of around 90% – with spray you’re lucky to get 70%. If you don’t know how to do it yourself, talk with a landscape contractor, designer or architect that can help. Take a class and learn. Do you really need all that lawn? Some communities and water agencies will pay you for every square foot you remove. Talk to your water agency and find out what incentives they offer, there may be rebates for Smart Controllers available and other offers as well.
It’s in the upper 80’s today here in Applegate – think I’ll go out and put some more mulch in the vegetable and shrub beds.
Please use the contact form below and let me know what you think or if you’re interested in taking an upcoming class – I’ll be back in a few days and in the meantime –

Thanks,
Rob
Inspiration, Carolyn Singer and a Fresh Start
May 7, 2013
There’s a saying – “Gold is Where You Find It” to this I would add that inspiration is where you find it too. I’ve just recently had the pleasure of picking up a copy of Carolyn Singer’s new book “The Seasoned Gardener” and it reminded me of why I fell in love with gardening in the first place. I think that for many of us going from being a gardener in your own landscape and entering the world of being a landscape contractor, designer or architect changes the way we view what we’re doing. After all, once you start making a living by installing landscapes the ugly head of ‘cash flow’ is raised and along with it the realizations of timelines, payroll, insurance – you know the drill. It can rip the magic out of what we got into it for the first place.
That is why this book is so refreshing – it’s more like sitting down and having a conversation than reading a book. And this is a conversation – it’s a compilation of around 5 decades of garden writings and observations. Starting in January Carolyn walks us through the year – what’s growing, what needs mulching, when to sow seed and when to prune. Is it a regional book – absolutely. She has gardened in the Sierra Nevada foothills for 40+ years and the information, advice and viewpoint is for us right here in the Mother Load.
So, why did it inspire me and why did I decide to write an article about it (notice I say “article” not blog. FYI: I hate the words blog and blogging – I think they’re stupid! – there I said it!) It brought home the joy of watching a new plant grow from seed, it reminded me of the pleasure of digging in rich, organic, good smelling soil and it brought back memories from when I wasn’t always having to chase the almighty dollar at the expense of the plants I was installing. Gardening is and always should be a connection with the earth. Whether it be growing your own vegetables or cut flowers for the dining room table.
I’ve found inspiration in many things – watching the documentary by Ken Burns on Frank Lloyd Wright reminds me that you’re never too old to succeed – Wright was 70 when his practice boomed again and he kept right on going until his death at 93 – talk about never giving up and always looking to grow. I get inspired when I walk in the mountains by myself and am surrounded by the beauty of nature – how blue a sky really is – the sound of creeks and rivers spilling over boulders – the contrast of granite rock against snow. Where and why a plant grows in this one place but not across the path. I learn from these experiences and it invigorates me and makes me anxious to get back into the craft of designing and the enjoyment of teaching. Something inspires you too – I know that. And sometimes we’re surprised by what does get us moving again. Pull the blinders off and start to see what you’re looking at, you never know where it will lead.
So what is the fresh start I mention in the title? It’s just exactly what you been reading. I’ve tried writing articles and I’ll tell you it’s tough! And the reason was, with a few exceptions, I wasn’t inspired. I’ve finally figured out that I am going to be posting articles much more regularly and I’m going to write about stuff that I’m excited about – stuff I want to share and that I think is important. I’ll be answering questions that I’ve been asking myself and that clients and students have asked me over the years. I’ll be exploring and documenting Spring as it climbs the mountains from here at 2,000 ft. up to the top of Castle Peak at about 9,000 ft. Why do native plants grow where they do and if we’re going to work with them in our gardens we really should have an understanding of what they need to survive and thrive. What’s the big deal regarding water efficiency and why it really does matter – do you know what watershed you live in? This stuff is important and I’m going to start delving into it. I hope you’ll come along with me on this and please – leave a comment once in a while – I’d like to know what you think and if anyone is listening.
See you in a couple of days!
Rob
